Please note that building the source code is only required if you want to change the source code.
It’s not required if you want to build a EVSE and use a pre-programmed Smart EVSE module.
To build the Smart EVSE source code and program it into the microchip PIC18F26K22 controller you require the following components:
- MPLAB X IDE
- MPLAB XC8 compiler
- A local copy of the Smart EVSE source code
A step by step guide to build and program Smart EVSE:
Step 1: Download the MPLAB X IDE
Smart EVSE software can be build using the MPLAB X IDE.
This IDE is available for Windows, Linux and Mac OSX from the Microchip website.
The current version is v4.15 and works with Smart EVSE.
Step 2: Download the XC8 compiler
To actually turn the source into binary code which we can program into the PIC controller we require a compiler.
In the case of Smart EVSE we need the XC8 compiler which we can download from the Microchip website.
(please note that the older version of the SmartEVSE controller used the C18 compiler, we assume you are building for V2 here)
Please download version 1.45. Version 2.x of the XC8 compiler currently does not work.
Step 3: Import the Smart EVSE project
By now we have the MPLAB X IDE and Microchip XC8 compiler installed on our system and we are ready to start the IDE.
Below are a couple of screenshots which show you step by step how to import the Smart EVSE project.
Note: The screenshots were made on a Windows system:
When you open the MPLAB X IDE for the first time you will be greeted with a startpage. Click on File -> Open project.
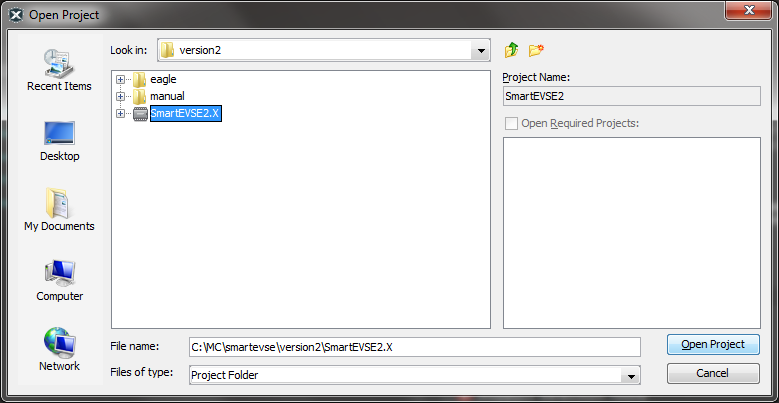
Browse the the version2 directory from the Smart EVSE repository you cloned and select SmartEVSE2.X.
Click on Open Project.
All done! You should now have the Smart EVSE project imported into your IDE.
Step 4: Build Smart EVSE
To build the Smart EVSE click on the EVSE_MAIN project with the right mouse button and select Clean and Build.
The IDE now start invoking the compiler and the status Output should show:
BUILD SUCCESSFUL (total time: 6s)
Step 5: Firmware programming using the bootloader
In order to program the firmware into the SmartEVSE module, a FTDI cable is required.
Connect the FTDI cable , with a 6 pin pinheader to the SmartEVSE, and the other end to your PC’s USB port.
Make sure to provide power to the module.
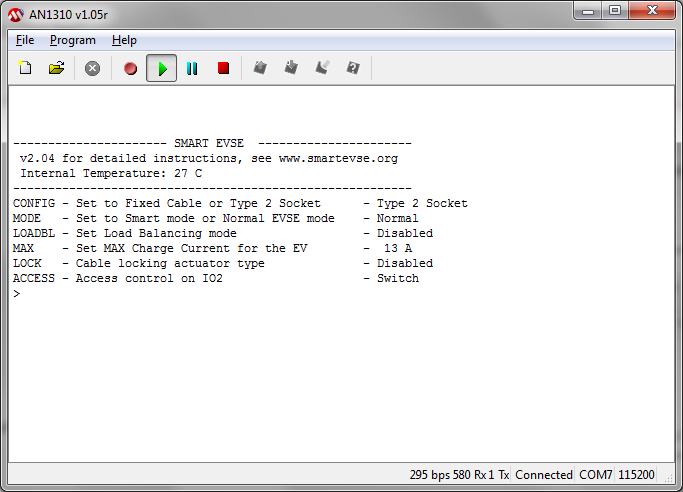
Start the AN1310 bootloader program in the /bootloader directory.
Setup the COM port your FTDI cable uses (115200 8N1).
Make sure the “Write Options” checkboxes for Program Memory and EEPROM are selected.
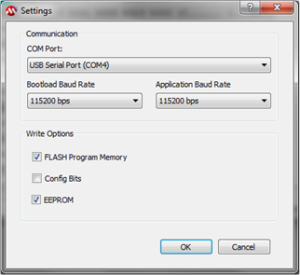
Make sure there is no car connected, and press the red STOP button (bootloader mode).
It should display “Bootloader firmware v1.05″ on the bottom of the window.
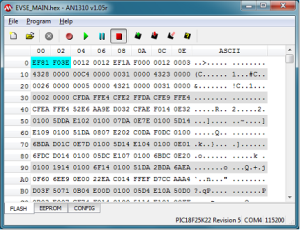
If this worked, you should be able to reprogram the software in the module using your just compiled (HEX) file.
In case you did not compile it yourself, the latest firmware file can be found in the /dist/default/production/ directory.
Click on File, Open, and select the “SmartEVSE2.X.production.hex” file. Then click on the red arrow (Write device)
After programming, you can click on the green PLAY button to use the terminal mode, and the module should power up.
If all goes well you should now have programmed the software into the Smart EVSE! Congratulations!